
Two weeks ago, we introduced our “5 DIY Cyber Security Skills Every IT Professional Needs to Master” blog series. I discussed the first skill on the list, using virtual machines (VMs), and why they’re practically indispensable for simplifying day-to-day security tasks. Today, I’ll explain the importance of the network mapper, also known as nmap — a critical command line tool that improves network visibility and overall security.
Nmap is typically used for network discovery and security auditing. It’s found on most default Linux installs, and helps users determine all sorts of information, especially from a network monitoring standpoint. If you’re apprehensive about the command line, there is a GUI version called Zenmap, although I strongly encourage getting comfortable with the command line version.
Nmap comes in handy for identifying live hosts on a network, finding open ports and listening services, and checking for vulnerabilities. These basic cyber security capabilities are invaluable for all IT professionals.
For instance, by identifying live hosts on your network, you can quickly determine if there’s anyone on your network who shouldn’t be there or if a host is unintentionally down. If you can identify open ports and listening services, you can catch potential C2 or exfiltration channels, misconfigured network applications, unused/unapproved software, and outdated applications. Lastly, it’s critical that you’re able to consistent check and verify vulnerabilities. Let’s walk through a few examples. I must add a disclaimer that there are multiple ways to perform these tasks.
Identifying Live Hosts on a Network

This one is simple. The -sn command disables the port scan, so we’re just doing a ping scan for the range of IP addresses. You can scan a subnet, domain, single IP, or a list of IPs, so it’s very flexible. The result is a list of systems that are up. To routinely scan for unauthorized devices, save a list of IPs that should be on your network, set a recurring task to scan your network, compare results against the approved list, and send an email notification if anything is different. Not all systems respond to ICMP, but other scans will often work, and I encourage you to experiment with them.
Finding Open Ports and Listening Services

The –sV command tells nmap to run a service scan, the –p and following integers tell nmap which ports to scan, and lastly there is a range of IP addresses to scan. Below is a sample output of this scan, but for a different IP address:
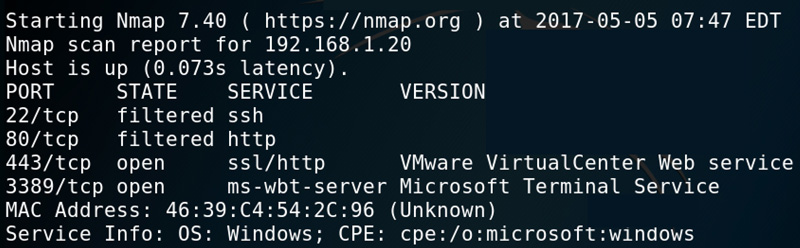
If you add the open option, you’ll only see open ports, which can be helpful if you’re scanning a lot of ports. If you have a baseline documented for each system (hint hint), you can use this information to identify anomalies.
Checking for Vulnerabilities
Nmap can also run scans for numerous vulnerabilities. A vulnerability scan can include a search for thousands of vulnerabilities on hundreds of systems, so be cautious with your scope. I’ll use an example that’s quite narrow in scope to provide more context.

The –script=vuln option says check for any vulnerabilities nmap is aware of, while the -p80 option gives the port (or range) and the -vv indicates verbosity level 2. The list of vulnerabilities can be numerous, so it’s important to cut the list down by categories (check the main pages for info). Here’s part of the result:
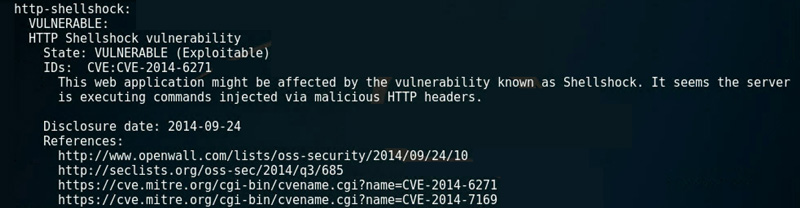
Here we see at least one vulnerability so far, and we were continuing through the process, we would research and verify that it indeed exists. The next step is to verify if it’s true. This example was against one system and only for port 80 — your results should be different.
Summary
Nmap has more functionality and power than we’ve covered, but these are the basics. A lot of the power of nmap comes from working with different output types and being able to write decent scripts, so practice using nmap often. On more than one occasion, I’ve created Bash scripts with nmap commands that I use for initial recon. It may all seem simple, but that’s what being handy is all about. Take the lessons learned from part one of this blog series to set up a few VMs and practice scanning them.
In our next blog, we’ll talk about coding essentials. Every IT professional and cyber handy man or woman needs to know how code works. We’ll dive into a few programming structure basics and how you can use these structures. In the meantime, you can learn more about our cyber security training courses and services.
Matt Kuznia is the strangest mix of things you can imagine. He’s part musician, black belt, snowboarder, computer geek, Baltimore Orioles fan, runner, and of course, DIY’er (cyber and otherwise).
You can follow him on Twitter, @understateme, for his latest #cyberhandyman tips and tricks.